Tuesday, August 30, 2011

Baby Taggies and Baby Doll Taggies

After a summer of lots of crafting and blogging, it is back to the grind! I am [trying to] focus long enough to get some straggling projects done. One of them is baby gifts, and, since most of them have yet to be delivered, here is a pic of one that is already at his home, just waiting to be used by a sweet baby boy.


Burp Cloth and wipey case

Taggie and boppy cover.

All of the above was made with my "stash" of fabric from Joann's 75% off out of business sale. (Can you believe instead of moving <1 mile down the road they completely liquidated all of the fabric to open anew? Their loss, my gain!) So glad I could foresee these baby projects in the future, because I LOVE all of this fabric. Love Love Love!
SO....while I'm sewing away during Sawyer's nap time, the big kids pick up scraps of ribbon and minky fabric from the floor and asked me to make their dolls taggies. How do you say "no" to that? So, about 20 minutes later, we had this...


I think Ranger has forgotten all about his, but a week later, Lucy is still taking her doll and taggie EVERYWHERE! And, while we're talking about Lucy, I want to also report that she found these hats in her toy box (crocheted 2 years ago) and she and bitty baby are both wearing them to sleep tonight! I love you Lucy! You will get plenty of handmade things from me in your lifetime!

Wednesday, August 10, 2011

Designing Dana's Header

So, I am flying high right now! I entered a "Design my Header" contest for my favorite handmade blog, MADE. Out of 180 people and 309 entries, TWO of my headers were chosen to be in the top 35! No way! Here they are. Dana is showcasing her top 35 today and tomorrow and will narrow it down to the top 3! Even if I make it no further, I am pumped to have made it this far. Here they are, and here is the link to her post to see the rest. And, if you don't have her site bookmarked or followed, do so now! You won't regret it!

MADE 2 by speech_chicky
MADE 2, a photo by speech_chicky on Flickr.


I just love the sidewalk chalk font on the picnik site. Here I was able to use it in a very neat way. I LOVE the pink converse and red curb. Also, I am a sucker for pink converse since I had some as a child.

Made 4 by speech_chicky
Made 4, a photo by speech_chicky on Flickr.


The inspiration for this picture was the super cool funky tattoo font that picnik has. I remembered reading this post about Dana's super crafty sisters, and I thought, "I wonder if I could find a photo of her super rad temporary tattoo artist sister to tattoo the made logo on." It took some searching, but here it is. I really thought this would make Dana and her sis smile and was floored that it made her top 35! OK, there's my bloggy joy for the day.

Thursday, August 4, 2011

Thrifty Finds: Etched Vases

My interview is up here. I had decided I would do this as my craft if I made "the cut". When I didn't, I decided I would do them anyway. There is a very COOL and CHEAP thrift store in the area that I scoured for plain glass vases. The guy gave me a deal: .75 for the big vases and .50 for the small ones. I took it. And, in about 5 minutes, made this.


Here's what I did. Using my Silhouette, I cut words out of vinyl and used the negative space and stuck them to the vases, making sure to seal the edges of the letters very tight. This was a little difficult since the surface is curved, but it helped to start in the middle. Some of the letters required pieces to be placed in the middle (like the middle of the "a").

Then I painted thick, even layers of etching cream on them. Silhouette sells this, but I used Armour Etch from Hobby Lobby ($9 for 3 oz. which will last FOREVER!) This stuff is potent and includes ammonia and other strong stuff, so use gloves and keep out of children's reach!


Then I washed the etching cream off after about 5 minutes and removed the vinyl.

And there ya have it! I also made some flower pens to put in it since we seem to ALWAYS be out of writing utensils around here. This is a cheap fun gift. I actually made another vase for a newlywed couple that turned out really neat. This is a great cheap gift for anyone!

Friday, July 29, 2011

Cash Register Doesn't Make Cut: Crafter Voted Off

Here are the polls from this week.
Mine was the cash register. I am "going home."
Poll: Kids Can Do {week 6}
Other crafts were great this week, too. My personal favorite (besides mine) is the sash, because it is hard to sew for boys. Now, let me explain...

I LOVE this cash register. I worked on it most of the week and had a friend come and take photos with her DSLR camera. Then I threw random photos together very haphazardly and failed to properly present it. Both my friend the photographer and my husband called and said, "Why are your photos so small? Why do you have fewer photos than the others? And why didn't you get a close up of the cash register?" They weren't telling me anything I hadn't already asked myself. I NEVER expected to make it to the top 5 so I forgot that at that point the stringent 3 photo only rule had increased to 5 photos. And I don't know why I didn't make them large.

So, without further ado, I bring you, the CASH REGISTER!

BEFORE

AFTER

Chick Fil A buttons

Homeland Apron

Laminated Homeland Coupons and Scanner

Working the register

Chick Fil A apron and buttons

So there ya have it. I love this craft and there is actually a story behind how I found it. The original plan was to find an adding machine that printed receipt paper and I was going to build a drawer under it. Thanks to my husband's perseverence, we continued to go to thrift stores and not give up, and we actually found a real working cash register! Score Score Score!
BTW, thanks so much for voting and I am very thankful for the opportunity to finally participate in SYTYC. It was actually Season 1 of the contest that inspired me to start a craft blog. I still made a craft for next week's theme so stay tuned. It is cheap and quick and amazing!

Thursday, July 21, 2011

Shout out to Whimsy Couture

This week is pretty crazy on SYTYC. Theme is "Upcycled" and everyone did great! There are 5 left, with 2 WAY in the lead and the bottom 3 rotating in last place. I am very happy with my craft this week and at peace with "going home" should that happen. I LOVE my next week's craft and will showcase it on here even if I go home, so check back.

I wanted to give a shout out to one of our sponsors, Whimsy Couture, who will be giving 3 ebook patterns to the winner of this season's SYTYC. I was perusing her shop to make a list in case I won (insert laugh here....have you SEEN some of the ladies I am crafting against?). She happened to be having a 50% off sale that ended that evening, and I HAD to get this Mommy and me pillowcase garment pattern for me and Lucy. My girl LOVES to match mommy and this was too perfect. Lucy even helped me pick out the fabric, and said she wanted one part flowers and one part polka dots. I was a little nervous about finding fabric that didn't look too elementary, but I love how these turned out! Last week at Affair of the Heart, a big local craft fair, these were everywhere, for , like, $30 a piece! Whimsy Couture lets you sell all of their patterns in your shop. Hmmm. Enjoy. And, don't forget to vote for your favorite upcycled craft here. Polls close tomorrow at 9 pm.

Lucy and I's pillowcase garments. I made myself the smallest size and then made it even smaller since somehow I cut my width a little small. I will go a size up next time but still love how it turned out!


Lucy's pillowcase dress. How cute is this??


Too cute not to pose, again!


Lucy with her cousin and little bro at Kiddie Park.

Thursday, July 14, 2011

Anthropologie Dutch Tote

I made it another week! No way! Thanks for voting. Mine was the Anthro Double Dutch Tote. Did you guess? I took it to the library last week and felt so hip to have such an awesome handbag. The tutorial will be up early next week. The main part of the tutorial will be measurements for the wood handle and the pattern for the bag, which is one long piece. I doubled this piece to make it reversible, but it was easy, straight stitches. Love love love.

I was very excited about this week's theme. I NEVER sew anything for myself, so I decided I would make myself a knockoff designer handbag. When I saw this Double Dutch Bag on Anthropologie, I knew it was the project for me!

Tadahh!


This bag is roomy and beautiful! It requires a small amount of basic carpentry and beginner level sewing skills. It is completely customizable and, even better, completely reversible!

I made one side feminine and gorgeous and the other side more casual. You can use any fabric you so desire and even upcycle old clothes! I used linen, upholstery fabric, and upcycled clothing (an old floral skirt and a very used pair of men's jeans). The original Dutch bag uses scraps of dutch mail bags with wording on it, and I used freezer paper stencils and fabric paint to mimick that.


Did I mention that I LOVE THIS BAG?

Saturday, July 9, 2011

Whizbang Firecracker Wreath Tutorial

I made it another week! Thanks for Voting. Polls ended like this.
Poll: Dollar Store {week 3}

Picnik is being SLOW tonight, so I'm going to do my best to crank out this tutorial with not so edited pics. Better now with so so pics than a year from now, right? So here it is!

Starting with a wreath and garland from dollar tree,


I laid out the 36 coin wrappers and spray painted them with chrome, and saved about 10 of them which were spray painted with black. This was the bottom layer that will be the "writing" of the sounds. If you don't want sounds on them, you can skip this first step.

The black was just valspar flat paint and the silver was...haha..bumper chrome. My husband had it in the garage. You can use chrome colored spray paint...the bumper chrome worked just fine.

Spray paint them. You should probably do one coat on one side, then when it dries, do the other side, but I just did them both sides at once. Some of the paint did stick to the box, but since this was the bottom coat, I didn't worry about it too much.


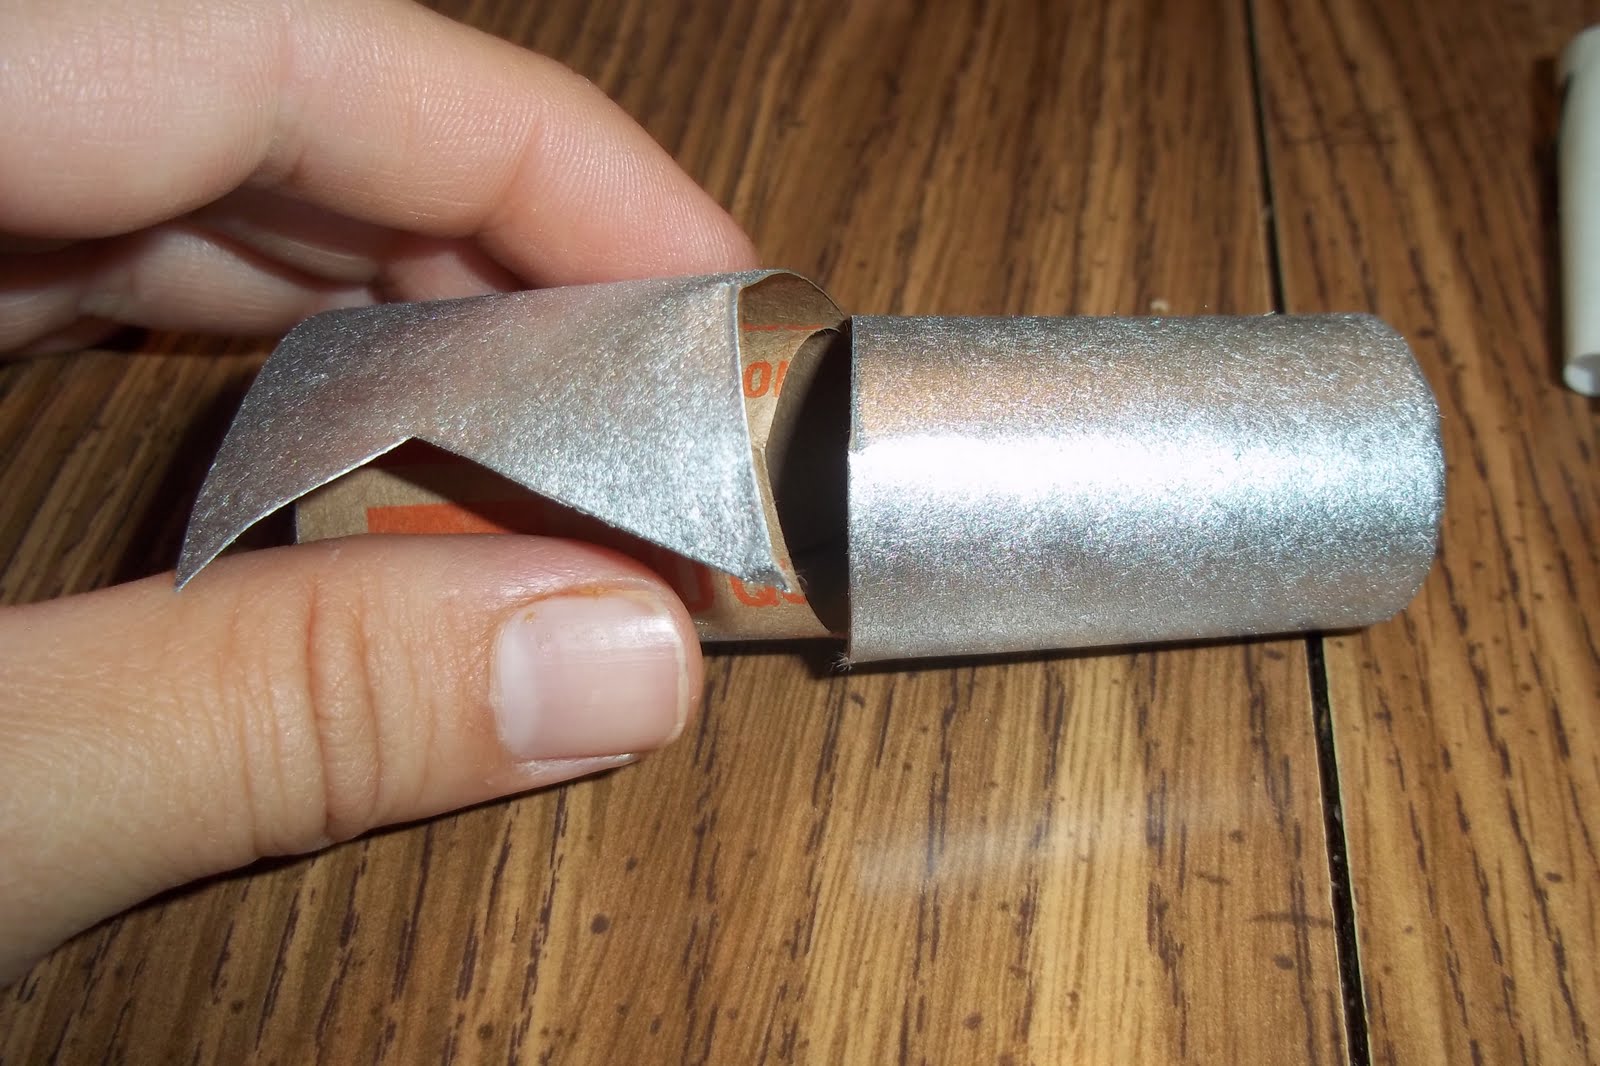
I cut each coin wrapper right in the center, and cut about 270 degrees around the circle, leaving only a small space of connection. It is important that you cut on the non rolled side, see the next pic, of when you cut on the rolled side.


It comes apart. No bueno.


Then you fold it back


And apply the word


Using my Silhouette cutter, I cut onomotopea sounds from black vinyl in a size 30 point font with the following styles--pow-snap itc, pop, bang, zip-bauhaus 93, Zoom-Bernard MT condensed; snap-copperplate gothic bold, crack-gill sans ultra bold condensed, kaboom-impact. If you don't have a silhouette, you can use scrapbook letters or skip this step. You could possibly use vinyl through a cricut. But you will keep having to change cartridges and it will take forever, so you will have big time Silhouette envy :) Then you separate the negative space from positive space.


Using the Silhouette transfer sheet, I peeled each word from the backing,

And stuck it on the side of the firecracker.


Now do this a whole bunch of times. I had planned on doing sounds on every wrapper, but realized real fast that only about half of them would have words. I hadn't planned on using the negative space for some of them, but thought "Why not?" I love the dimension that it added.


Back to the cardboard.


I separated these out and painted the chrome ones red and blue. The black ones were painted chrome. Don't have a pic of the paint but it was valspar flat spray paint. You can use whatever you choose. I REALLY should have turned these as they dried, but I am impatient and did it all at once. Some didn't look so good.

And when those dried, I put a coat of this glitter spray on it. I thought it would give it a more refined touch. I got this glitter spray at Michael's.

Then I let that dry.

Then I peeled the vinyl off.

How cool does that look? I went into this project very blindly. I was getting excited here that my efforts weren't thwarted.

Then you do that a whole bunch more times.

Then you get a wreath from the dollar tree.

Spray that with bumper chrome (lol) and let that dry.

Then you cut little one inch pieces off of the garland. It will still stay intact..yay! Excuse these pics. It is naptime with my tripod :)

Then you put hot glue in one side (don't burn your fingers although I did)

And put one side of the garland piece through the wrapper to the glue

Then hot glue the other side

Then open the middle and pull the garland through.

Then trim it with scissors to the length you desire.

Then do it 35 more times and you have your firecrackers.

Say a prayer of Thanksgiving that your dollar tree project wasn't a total failure and take pics of your fun firecrackers.


Then get your chrome wreath, and position the firecrackers the way you want them, and hot glue them on.


From this to this, not bad, huh?


And you will have plenty left over to make these necklaces for the kids. They will LOVE them. I just crocheted the necklaces with chain 40 of red and blue yarn with an I hook, and attached the firecrackers through with a needle and yarn, but you can use any kind of necklace you choose.

I will post more pics later of the kids in these festive necklaces. So much fun! Let me know if you think you will make this. Thanks.